
At Naxon Labs we focus on EEG technology and its various applications. We have developed custom software and interfaces that uses artificial intelligence to identify patterns and process data recorded by portable, wearable EEG devices like Muse. The BCI technology used by Naxon Labs provides a direct communication pathway between the brain and an external device. The data obtained can be used in various fields, including medical, research, self-improvement, product development, advertisement, neurofeedback, and other uses.
Muse is a portable, wearable EEG device that Naxon Labs uses to obtain data. It is easy to set up, light, and available for consumers to purchase to record their own brain waves in various settings, including sleep, concentration periods, and different emotions. Muse has different models and generations, and its impressive results mitigate the limitations of being portable, which include using fewer electrodes than conventional EEG devices or being more prone to interferences.
Naxon Explorer and Naxon Emotions are the main products of Naxon Labs, which are an integrated platform with machine learning tools and automatic pattern analysis. The data recorded in sessions can be downloaded and processed in other tools for different analysis, including training for machine learning in specific use cases.
Adjusting the Muse devices for a proper data reading with Naxon Labs
To ensure a proper data reading and recording, the Muse devices need to be treated with care and adjusted properly. You must adjust the electrodes properly in the headband to avoid chaotic signals due to artifact position and its electrodes. The ears electrodes should be adjusted before starting the recording, and hair should be banded and electrodes wiped for better wave quality.
In the following picture of a Naxon Explorer session where you can see the brain waves pattern, and you can realize if you are not adjusting the sensors properly in the head band. The Muse S device has four electrodes. Two to be placed on the forehead and two behind the ears. In this first session, the ears electrodes (TP9+TP10) signals were chaotic due to the artifact position and its electrodes. To avoid this, it is better to adjust the electrodes before start the recording. Also, you may have to band your hair and wipe the electrodes to get the best waves quality.
The following session shows a scenario where the electrodes are correctly adjusted. In this case it was practiced meditation for approximately 90 seconds. In this record you are able to see the low frequency waves which appears with stillness and calmness.

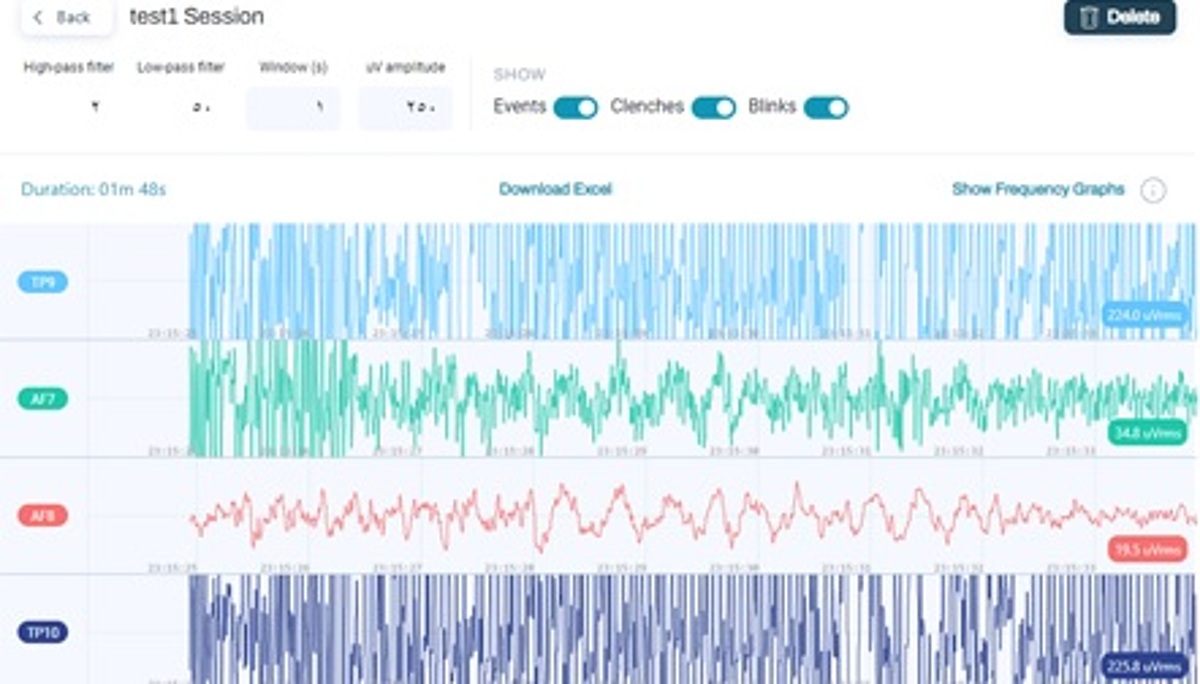
And the following picture is another example of smooth data recording with proper device adjustment:

How do I improve the sensor / signal quality with Muse?
Before each session, Muse checks to see if your headband is turned on correctly and is getting a strong enough signal using a coloured semicircle shown below. This step is designed to ensure your Muse is responsive and accurate during your sessions for the best results. Whether you're having trouble getting the headband status indicators to fill in, or your sessions are being interrupted with signal quality disruptions, there are a few steps you can try to find a fit that works for you.

You can learn more in this article and the specific recommendations for Muse 1 / Muse 2 and Muse S.
Cleaning and taking care of Muse 1 and Muse 2 devices.
Muse devices must be treated with care, and proper steps should be taken to ensure their longevity. For instance, the Muse 2/Original Muse is a sensitive device that should not be submerged in water or exposed to extreme temperatures or sunlight. They should be stored in the same box or hard case they were received in, and protected against sudden impacts or extreme bending. The headband sensors and silicone earpieces should be cleaned from time to time using a small amount of rubbing alcohol on a cotton swab, and the plastic casing and the rest of the headband can be wiped down with a lightly damp cloth.
The following video tutorial is very helpful:

Cleaning and taking care of Muse-S devices.
The Muse S is also a sensitive device that should be treated with care. It should be stored in the same box or hard case it was received in and kept beside the bed for easy use and to remind users to recharge it each morning. Users should avoid over-stretching the Muse S band near the electrode patterns to prevent cracks or damage to the electrode design. They should also avoid folding or bending the fabric where the sensors are when traveling with the device. Users should avoid using skin care products or chemicals prior to using Muse S, and if they do, they should ensure they have dried before placing the headband on. The hooks on the pod of Muse S (Gen 2) should be handled with extra care and gentleness to secure the pod to the band.
To assemble the new band and pod properly, hooks have been added to the Muse S (Gen 2) connector side of the pod to secure it to the band. The hooks ensure the electrical connection is consistent and reduce the chances of it disconnecting during use. The user should align the two holes on the band with the hooks on the pod and push down firmly until the pod snaps into place. The user should then secure the hooks by sliding them towards the pod's center.
Upon assembly you will want to be sure that you're clicking them into place so there are no gaps. If there is a gap between the pod and the wing, the electrical connection may be interrupted, preventing you from proceeding through Signal Quality Check until the pod is accurately secured. Although this may present as a signal quality issue, rest assured this is easily resolved using the assembly instructions in this video:

Follow Muse instructions to properly assemblethe Muse S (Gen 2) pod:

If you wish to wash your Muse S Headband, it is important that you disconnect the Muse S Pod prior to doing so as the Pod cannot be washed. Your Muse S headband must be hand washed with a mild, scent-free detergent.
Do not put Muse S in a washing machine or dryer as this will damage Muse S and will not be covered by Interaxon's warranty.
After hand washing Muse S, gently towel dry it, then leave it laid flat to dry. Reconnect the Muse S pod once the Muse S Headband is completely dry, allow 24 hours to ensure it is fully dried. Muse S headband cannot be placed in a tumble dryer, however having it sit near a heating vent for faster drying will not damage the Muse as long as it is not directly in contact with the vent or direct heat.
You can watch the following video where Amanda Fleury, former Hardware Research Engineer at Muse, explains the right procedure:

After some time your Muse-S fabric band will naturally start to show signs of wear-and-tear over time with repeated use. This is perfectly normal and first signs of wear may be seen on the champagne coloured electrode areas above the left & right ears.
If this happens to your Muse-S band, this doesn't necessarily mean your device has stopped working, but if you do start to notice any connection issues, you can reach out to Muse Customer Care team for additional support.
In general, the more frequently you use your Muse S device, the quicker you may see signs of wear. Using your device consistently anywhere from 3-6x/week over a 3-6 month period, your fabric band may begin to show signs of wear.
To reduce wear and tear, please follow the care and washing instructions mentioned above and remember to handle the device with love.
Connecting Naxon Explorer and Naxon Emotions from a desktop, laptop or mobile device.
If you have challenges making Naxon Labs products work from your equipment, check the following procedures.
Connect a website to a Bluetooth device: Chrome lets you connect a website to your Bluetooth devices.
You can choose your default permission setting on your computer.
Pair Naxon Explorer or Naxon Emotions webpage in Chrome with your device
On your computer or phone, make sure Bluetooth is turned on. On the Bluetooth device, make sure the device is discoverable.
Sources and more references:
Using Naxon Explorer with Muse-S
https://choosemuse.my.site.com/s/article/How-do-I-clean-and-care-for-my-Muse-2-or-Original-Muse
https://choosemuse.my.site.com/s/article/How-do-I-clean-and-care-for-my-Muse-S
https://choosemuse.my.site.com/s/article/How-do-I-assemble-my-Muse-S-Gen-2-pod-to-the-band
https://choosemuse.my.site.com/s/article/Why-is-my-Muse-S-beginning-to-show-signs-of-wear
https://choosemuse.my.site.com/s/article/How-do-I-get-good-sensor-signal-quality-with-Muse
Naxon has financial support by ANII (National Research and Innovation Agency)